Simple Bread Making without Fuss… or a Fancy Kitchen, for Kids and Grownups Together
Hi all!
Most of you know me as a writer, but I’m also an equine (horse) veterinarian. After an injury, I thought I’d never practice again, so I went back to university and completed a Graduate Diploma to teach secondary biology and chemistry.
I’m now back practicing veterinary medicine again, but with the onset of COVID-19 home isolation or quarantine, or School Time Out, I wanted to help as many of you as possible to enjoy the extra time you get to spend with your families.
I’ll be posting several times each week on my Lizzi Tremayne website with activities for kids (little and big) and grownups (mostly recipes) during our worldwide time-out. This widespread home isolation hasn’t happened before in the memory of most of the world’s population, so it’s an “open book”! I encourage you to use this time as special time with your families! If you were here with me, I could find fun things to do working around my little farm in New Zealand, but since you’re not, I’ll have to share some activities and a bit of what I’m doing on my farm and in my home during the coming weeks, instead. If you follow my blog, you’ll be emailed when a new post goes up!
I hope you’ll join me.
xx
Lizz
Simple Bread Making without Fuss
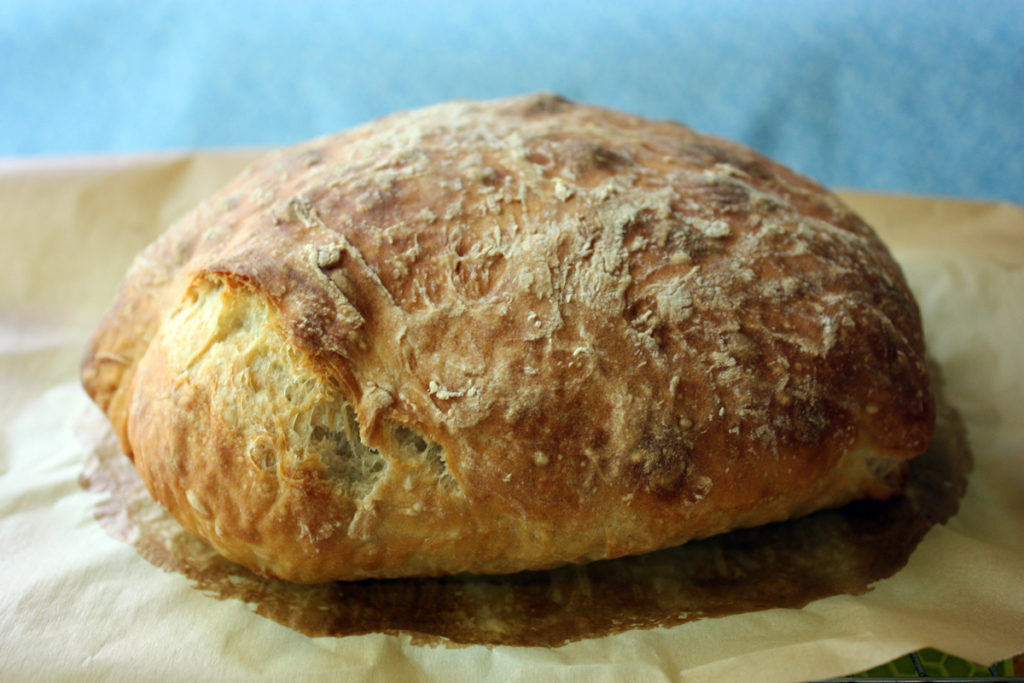
So you haven’t made your own bread before? No bread maker? No bread pans? No Dutch/Camp Oven?
With Coronavirus about, getting fresh bread… or any bread, for that matter, may be a challenge.
FEAR NOT!
Here’s the recipe for you! YOU AND YOURS CAN DO IT
Makes: One loaf
Ingredients:
- 390 g (approx. 3 cups) all purpose or bread flour

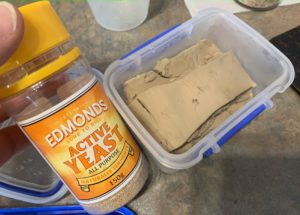
There are dried and cake yeast, but mostly find the dry in stores. - 1/4 teaspoon yeast (active dry or instant)
- 1 teaspoon salt
- 354 mL (1 1/2 cups) hot tap water, not boiling out of the jug– up to 54°C (130° F)
- (about 2-3 Tablespoons extra flour for shaping)
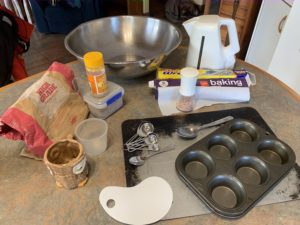
Tools:
- Large bowl and plastic wrap, or lidded bucket, or lidded container (big click-clack or Tupperware-like). Something to keep cold drafts out and moisture in.
- Measuring cup (if you don’t have one, use a cup you do have that’s about the right size and use it for all of your measurements. You don’t need a scale for this one.)
- Measuring spoons (or use a regular teaspoon and estimate. This is not rocket science)
- A clean bench to work on. (Yes, you can clean it, kids!)
- Baking Paper
- Baking sheet
- Oven: Fan forced is nice but not necessary.
- Muffin tins or a baking pan that holds water to make steam inside your oven
- Hot water (ideally from your hot water jug/kettle) for the steam-pan setup
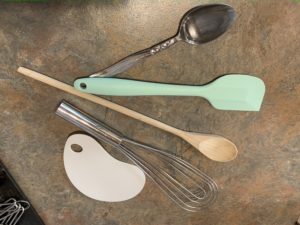
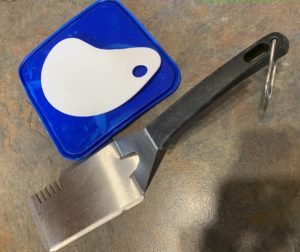
- Scraper: nice to have but not necessary
- Baking scraper, or use a spatula if you don’t have one. You can make one from an ice cream container or something slightly thicker. I’ll put in a photo.
Instructions:
Measure and mix flour, yeast and salt in your bowl or container. Add water while stirring (a scraper is nice here) and stir till it’s well-mixed.
Cover with plastic wrap or the lid (see Supplies) and stand in warmish area of the room for three hours.
The dough will become puffy and dotted with bubbles. Tip it out of the container onto a well-floured surface and sprinkle dough with a little flour.
Use your scraper to fold the dough over 10-12 times (the kids love this part!) and then shape into a rough ball.
Place baking paper onto a baking sheet and cover with a towel or the upside-down bowl and let rise on the bench for 35 minutes.
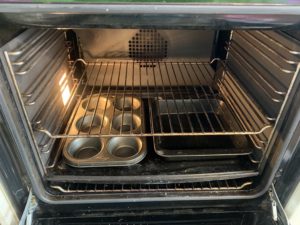
While that’s sitting, put your muffin tins or baking pan into the oven (leaving room for your bread on its baking sheet!). I put it on the bottom of my oven. This makes steam, which makes for chewy, yummy crusts. (commercial bread ovens inject stem into the oven! My dream!)
Preheat oven to 232°C (450° F).
After bread has been rising for its 35 minutes, it should be a bit puffed up. Place the bread on its baking tray (with the baking paper) into the oven.
If you’re not a grownup, get permission and help from your caregiver/parent to do the next step, as you could be badly burned if the hot water spills.
CAREFULLY pour hot tap water or boiling water from the jug into each of the the muffin tin hollows or the baking pan to make steam for your bread. (THIS IS NOT the bread baking sheet!)
Immediately close the oven door–you want to keep that heat in! It makes a big difference to the final rising of the bread.
Bake for 30 minutes.
For a crispier, darker crust, remove the baking tray with the bread from the oven and place the bread on its baking paper back into the oven without the baking tray, straight on the oven rack. If you have a gas oven, ensure the paper is not near the back of the oven, or where flames come out.
If you want to make the bread overnight, use cool water instead of hot tap water and rest dough overnight on the bench top for 8-24 hours, then proceed as per directions.
Simple Bread Goes Fancy
After you’ve made this a few times, you can play with the recipe. Try seeds? Cooked grains? Cooked rice? Uncooked oats? Other types of flour? Remember if you use all whole wheat or other hearty flour, it will become a rock. Fine if you like rock bread, but if not, play with varying ratios of white to heavier flours. If you mix in a little sourdough culture when mixing your dough and leaving it to set overnight, it’ll be sourdough!
THE SCIENCE BEHIND BREAD MAKING
You thought you were going to get off easy after yesterday’s chemical reactions, eh?
Not so fast, bucko!
To those of you missing out on school, here’s a bit of biology and chemistry at once, and you get to eat the results (Apologies if you’re GF, but if you can be patient, I’ll be posting a recipe just for you soon!). Doesn’t get any better than that!
Okay:
In its most basic form, flour is made up mostly of carbohydrates, which are multiple sugar units stuck together. Different types of sugar have different structures, but I won’t torture you with that today. Anyway, in the absence of oxygen (reactions in the absence of oxygen are called anaerobic reactions, an=not) live yeast organisms breaks down the carbohydrate structures of your flour and other added sugars to alcohol and carbon dioxide in a process called fermentation. Remember carbon dioxide? that’s CO2 to you guys, from yesterday’s post about volcanos? The alcohol evaporates in the oven, forming its own gas bubbles, further contributing to bread rise.
Here are today’s questions to answer below:
1- What do you think all that CO2 and alcohol that’s generated by the yeast will do to your bread dough?
2- What did CO2 do to your liquid in the volcano?
3- If we used a flour that was more complex, or larger-grained, how do you think that would affect the rising of your bread? Hint: whole grains are harder to break down… how would this affect rates of reaction?
4- If you use larger chunks of grain (vs finely ground grain), how are rates of reaction to create CO2 affected and why does this happen? This is a NZ Level 2 question… you’ll see this again, might as well learn it now! 🙂
I found two very cool websites that go into these topics and how they affect the bread you make:
Remember to post piccies of your bread or of your family or bubble-mates making it! PLEASE???
PLEASE SHARE, ALL! THE MORE PEOPLE WE KEEP FROM GOING STIR-CRAZY BY LEARNING NEW SKILLS TOGETHER, THE BETTER!
I adapted this recipe for the Kiwi kitchen from Jenny Can Cook’s website, with thanks!
Check out Jenny’s page for more scrumptious and simple bread recipes and videos!
Have fun, all, and LET ME KNOW how you went in the comments below! I’m not sure if can post images, but I’ll work on it. If I can’t, you can PM me on Facebook and send your photos to me there, I can post them on here. Unless I find out an easier way!
xx
Lizzi